
Purchasing a recreational vehicle is an exciting experience, but also a major investment. To avoid expensive repairs or even buying a lemon, a thorough RV inspection is absolutely essential before finalizing any deal. By following some key RV inspection tips and knowing what to look for, you can gain valuable insights into the overall condition, quality, and value of any RV you are considering buying.
In this comprehensive guide, we will provide an overview of the critical areas to inspect in detail when evaluating a potential RV purchase. We will explore exterior and interior inspections, mechanical systems, documentation, professional inspections, and other RV inspection tips you need to protect your investment. With proper diligence and this inspection checklist, you can make an informed decision and take ownership of your dream RV with confidence.
Key Takeaways
- Thoroughly inspect the RV roof, sidewalls, undercarriage, living area, kitchen, bathroom, bedroom, and all systems.
- Check documentation like title, maintenance records, accident history, and warranty terms.
- Hire a professional RV inspection service for an unbiased, expert evaluation.
- Test drive the RV to assess performance and handling.
- Use an RV inspection checklist to ensure all aspects are covered.
- Ask questions, take notes, and don’t feel rushed during your inspection.
Understanding Your Needs

Before starting the RV inspection process, take time to understand your needs and research different RV types, models, and floorplans. Determine what features and amenities are most important so you can focus on examining those areas more closely during an inspection.
For example, if you plan to do a lot of dry camping in remote areas, carefully inspect the freshwater tank, propane system, solar options, and generator. Or if you have a large family, pay extra attention to sleeping accommodations and storage capacity. Being clear on your needs will help you better evaluate if a particular RV is right for you.
Budget Considerations
It’s also important to set a clear budget for both the purchase price and any potential repairs or upgrades needed down the road. RVs depreciate over time, so newer models may fit your budget better than older ones that could require more maintenance. Get estimates for renovation costs to bring appliances, furniture, or other features up to par. And leave room in your budget for regular maintenance, insurance, registration fees, and campground costs. Being realistic about total ownership costs will help guide RV inspection priorities.
Inspecting the Exterior
The RV’s exterior shell and components endure the brunt of weather and road conditions. Thoroughly examining the outside surfaces and features is a top priority during pre-purchase inspections.
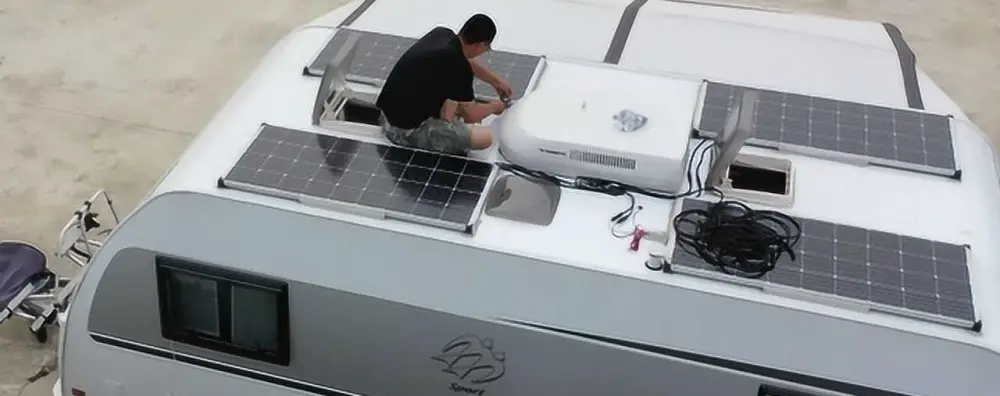
Checking the Roof
The roof is the most critical part of the RV exterior to inspect thoroughly. As the largest and most exposed surface area, the roof endures the most extreme weather exposure and is constantly at risk for leaks, damage, and deterioration issues.
Use a sturdy ladder to get up on the roof and meticulously inspect its condition. Look closely for any cracks, punctures, soft spots, or signs of deteriorated sealant that could allow water penetration. Check for sections that appear warped, buckled, discolored or show staining which may indicate water damage or structural issues below the roof surface.
Press firmly on all areas of the roof to feel for sponginess or springiness which signals delamination or waterlogging under the roof membrane.
Check all roof vents, air conditioners, antennae, racks, and other roof-mounted gear to ensure they are solidly attached, free of damage and have well-sealed fittings around any roof penetrations. Ascertain that seals around any plumbing or electrical lines running through the roof are intact and tight.
Inspect all roofing material seams and edges for any shrinking, gaps, or cracking that could provide a path for water intrusion. Use a stepladder and walk heel-to-toe across the entire roof while looking and feeling for soft spots or flexing while at roof level that may hint at moisture issues or structural deficiencies underneath. Shake the ladder while inspecting different areas and listen closely for any creaking or rattling noises which could indicate delamination or waterlogging issues within the walls just below the roof.

Examining the Sidewalls
In addition to the roof inspection, carefully examining the exterior sidewalls of an RV is critical to identify any imperfections, damage, or water intrusion issues over time.
Walk around the entire RV exterior and inspect every square inch of the outer walls closely, including any fiberglass, laminates or wall paneling materials. Look for any scrapes, cracks, dents, or punctures in the sidewall surfaces. Examine seal levels around any doors, hatches, attachments or fittings on the exterior walls. Check for any gaps, splitting, loosening or cracking around these edges and attachments that could allow moisture penetration over time.
Use a stepladder to inspect hard to see areas above the wheel wells and along the upper roofline where damage often occurs but may not be visible from ground level. Check any utility access doors or panels to ensure they close tightly and seal properly. Look closely for any uneven panel gaps, warping, loose trim pieces or cracking that could hint at underlying water damage or delamination issues. Press firmly on the outside walls and look and listen for any soft spots or flexing which are red flags for damage or deterioration under the outer skin.
Identifying exterior wall issues quickly can prevent costly moisture damage, mold and mildew problems on the interior.
Inspecting the Undercarriage
No RV inspection is complete without a thorough examination of the entire undercarriage. Use a creeper or knelt down with a sturdy flashlight to inspect underneath the RV from front to back. Look for any cracked, peeling, or missing underbelly panels that could allow moisture intrusion or expose insulation and holding tanks underneath to the elements. Check for any sagging, damage or rust spots on the RV frame or structural supports that could indicate accident damage or excessive wear.
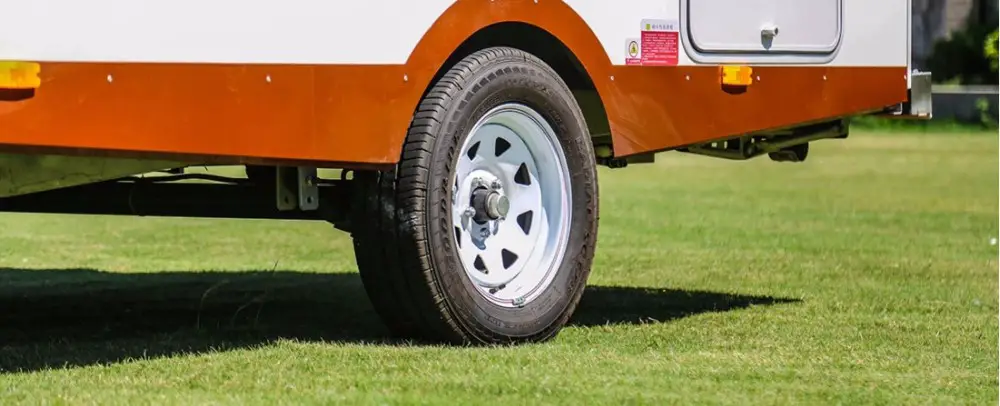
Inspect tires closely for cracking, dry rot, insufficient tread depth or uneven wear that necessitates replacement. Look closely at wheel wells for any signs of rust, peeling liners or damage from road debris. Check that the hitch and connectors are solidly attached and free of rust or damage.
Examine all plumbing lines, holding tanks, and electrical wiring routed underneath are intact, leak-free and solidly secured with protective conduits in place. Look closely at any furnace or generator exhaust piping for leaks, damage or sagging at connection points. Use a gauge to check tire tread if possible, as uneven wear or too-thin depth can be safety hazards.
Scan the entire underside for any sagging, cracked panels or insulation issues. Getting the RV up on a lift allows an even closer undercarriage inspection if feasible. Addressing any undercarriage problems promptly can prevent further drivetrain, exhaust or systems damage down the road.
In summary, meticulously inspecting all exterior surfaces of an RV takes time but is essential to evaluate current condition and identify any existing or potential problems needing repair. Exterior damage left unchecked can penetrate deeper over time and cause interior deterioration and structural issues. Conducting a comprehensive roof, sidewall and undercarriage inspection establishes the true exterior health of an RV before purchase.
Inspecting the Interior
After the exterior inspection, shift focus to the RV interior living space and compartments. Turn on all interior lights and generators to power appliances and equipment during the inspection. Bring along a checklist to document your findings room-by-room.
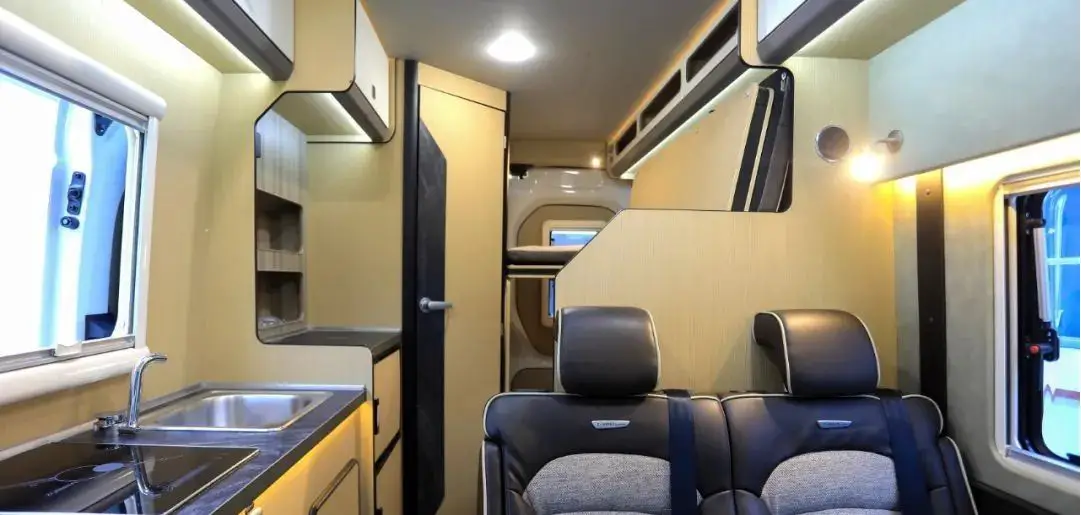
Assessing the Living Area
Turn on air conditioners, generators, entertainment systems, lighting, and 12-volt outlets to ensure all are working properly in the main cabin and living areas. Inspect all furniture for damage or stains, and check that cushions, sleeping areas, and storage compartments are intact. Open, close, and lock all doors, cabinets, and drawers to test for fit, function, and water leaks inside the RV.
Identify any loose fittings or broken latches for repair. Check that all windows open and close smoothly, the windshield is clear, and window treatments are in good shape. Look for interior water stains or moisture, cracks in molding or trim, and any soft spots in flooring. Test all entertainment components and electronics.
Evaluating the Kitchen
The kitchen often sees heavy use, so scrutinize it carefully. Turn on the refrigerator, stove, oven, microwave, sink faucet, and all kitchen gadgets. Inspect for leaks, adequate water flow and drainage, and any warning lights or error codes. Check stove and oven burner ignitions, microwaves, and other appliances for any sparking, delayed startups, or shutoffs.
Look inside cabinets and storage for any water stains, rodent droppings, or other damage. Assess the condition of all counters, sinks, fixtures, and hardware. Open and close all drawers and cabinet doors – repair any that stick or won’t latch properly. Check the sink and faucet water pressure and drainage. Identify any appliance or plumbing leaks immediately.
Checking the Bathroom
As with kitchen appliances, test all bathroom fixtures fully during the inspection. Fill sinks and tubs with water, and drain them completely while checking for slow drainage or leaks. Flush toilets to ensure proper operation and water flow. Turn on bathroom vents and extractor fans, and inspect seals around sinks and showers.
Look for any water damage, mold, or mildew on bathroom walls or cabinetry that could indicate leaks. Evaluate the condition of the toilet, shower/tub, hardware, ventilation, and all other fixtures. Make sure bathroom door and storage latches and locks are functional.
Inspecting the Bedroom
Inspect mattresses, bunks, and other sleeping areas for comfort, fit, and function. Check for bed bugs or any signs of infestation. Assess any damage to cabinets, wardrobes, or storage compartments in the bedroom. Inspect all drawers, doors, and mirrors. Turn on lights, test 12-volt outlets, and ensure any entertainment systems power on properly.
Look for any water intrusion or damage behind furniture or in closets. Check for adequate ventilation and airflow from vents or windows. Identify any loose moldings, damaged screens, inoperative latches, or other issues needing repair.
Mechanical Inspection
While the interior and exterior inspections evaluate RV living space, a mechanical inspection focuses on core systems needed for vehicle operation and off-grid function.
These include the engine, transmission, brakes, tires, and electrical systems running RV components. Have a certified RV technician thoroughly inspect all critical systems.
Engine and Transmission
Have a technician inspect the engine and transmission fluid levels, belts, hoses, seals, filters, and all other engine components. They should check for any leaks or visible damage. Look for corrosion, rust, or oil buildup on the engine and transmission. Request maintenance records and have the engine scanned for error codes.
Take the RV on a lengthy test drive to listen and feel for any vibrations, hesitation, abnormal noises, or issues when accelerating or braking. Have the transmission carefully checked for gear shifts and performance in all settings during the test drive.
Brakes and Tires
Brake wear and tear is common on heavy RVs, so a brake inspection is essential. Check brake pads, rotors, and drums for excessive wear or damage. Make sure there are no brake fluid leaks or issues with master cylinders and calipers. Carefully test brake operation at various speeds, including emergency braking, to check for any pulling, noises, or uneven wear.
Inflate tires to the recommended tire pressure and look for any bubbles, cracks, bald spots, or uneven tread wear. Check tire manufacturing date codes – tires over 5-7 years old should be replaced. Have a technician evaluate wheel bearings, suspensions, and alignments as well.
Electrical Systems
Faulty electrical systems are a top cause of RV problems. Make sure to have a qualified RV technician thoroughly inspect all electrical components. They should check shore power connections, converters, breakers, fuses, 12-volt systems, lighting, generators, solar panels, and wiring for any damage, corrosion, or functionality issues.
Request system voltage and amperage readings. Check that circuits are properly labeled. Test all interior and exterior lights as well as 120-volt, 12-volt, and USB outlets to catch any wiring issues. Identify any potential electrical hazards or rewiring needs proactively.

Documentation and History
In addition to physical inspections, verifying the RV’s documentation and ownership history is critical for identifying issues or past problems.
Request all maintenance and repair records, accident reports, warranty information, and any other available documentation from the seller. Verify that the RV title is clear and matches seller info. Run a vehicle history report to check for salvage titles, odometer rollbacks, or other red flags.
Ask manufacturers for specifications if buying new. Review all systems and construction material warranties. For used RVs, contact manufacturers regarding warranty transferability.
Get written estimates for any needed repairs identified during inspections. Confirm any repair claims, renovation details, and explanations from sellers in writing prior to purchase.
Thoroughly checking this paperwork provides insights into an RV’s past and helps avoid buying someone else’s problems down the road.
Professional RV Inspection
For the most thorough and objective evaluation, hire an experienced inspector from a reputable company to perform a professional pre-purchase inspection. They will examine all of the interior, exterior, mechanical, electrical, and operational components using technical tools, scanner devices, moisture meters, and other diagnostics.
Professional inspectors have extensive technical knowledge to comprehensively assess RV systems and identify issues not detectable by the average buyer. They provide detailed inspection reports documenting all findings, recommended repairs, cost estimates, warranties, and overall condition ratings. Many inspectors also include photos, videos, and system measurements as visual proof.
While an investment, a professional RV inspection provides unbiased insights that can alert you to major problems and save thousands in future repair costs. Buyers have walked away from RV deals after inspections revealed serious undisclosed issues. Consider it insurance against buying a lemon.
Conclusion of Essential RV Inspection Tips Before Buying
Buying an RV is a major purchase. While exciting, avoid RV buyer’s remorse by thoroughly inspecting any RV before purchase. Follow the interior, exterior, mechanical, and operational checklist outlined here to catch issues early. Hiring a professional inspector provides expert technical assessment. Take your time, follow inspection protocols, and don’t feel rushed by eager sellers. Investing the time upfront to meticulously examine an RV can help you avoid expensive surprises and repairs later on. By using these essential tips as a guide, you can make an informed decision and take ownership of your new RV with confidence.
Frequently Asked Questions
What should I look for when inspecting a used RV?
When inspecting a used RV, you’ll want to thoroughly check the roof, exterior sidewalls, undercarriage, interior living space, electrical systems, plumbing, appliances, engine, tires and all other mechanical components. Look for any signs of damage, leaks, corrosion, pests, odors and improper repairs. Request maintenance records and have a mechanic inspect all systems.
How do I find a reputable RV inspector?
Search for RVIA certified inspectors through the Recreation Vehicle Inspection Program. Check inspector reviews and certifications. Ask for sample reports of past inspections. Get quotes from at least 3 inspectors before choosing one.
What are the common issues found during an RV inspection?
Some of the most common issues found during RV inspections include roof leaks, water damage, electrical problems, appliance and slide out malfunctions, cracked underbelly covers, faulty generators and mold or pest infestations.
What is the average cost of an RV inspection?
The average cost for a professional RV inspection typically ranges from $300-$500 depending on the size and type of RV. Additional fees may apply for asbestos, mold and pest inspections.
Are there any red flags to watch out for when buying a used RV?
Red flags include mildew odors, soft floors, mismatched VINs, water stains, dated systems, modified or homemade repairs, missing slides, and an unwillingness to allow inspections from the seller.
What are some tips for first-time RV buyers?
Tips for first-time buyers include hiring an inspector, checking all systems, examining the RV top to bottom, taking test drives, consulting experts, joining RV clubs, researching costs and maintenance, attending RV shows and reading buyer forums to learn from other owners.